The Gateway
The most important part of all of this is going to be an Akeyless Gateway. This is a deployable container provided by Akeyless. It holds our dynamic producers, which are responsible for managing temporary credentials. You may ask: if Akeyless is a SaaS, then why are we deploying a Gateway? Well, the Gateway allows us to bring the Akeyless cloud directly into our network, which is a key part of why Akeyless scales better than other competitors. In particular, we want something that can manage database credentials for us, which means that we need something in our network. Without the Gateway we would have to setup direct network access with Akeyless, and that’s not what we want - whether via VPC peering/VPN/whatever, direct network connectivity quickly complicates our network topology and ruins efforts towards proper network segregation.
In our next post, we’ll be deploying the Gateway via Terraform. In this one, we’re going to perform a little bit of prep work - the last “manual” work that we’ll do as part of this entire effort.
Authentication
Setting up Authentication
First we have some authentication decisions to make around the gateway. We need to decide how the Gateway itself will authenticate to Akeyless and how users will authenticate to AKeyless to configure the Gateway. There are three easy answers to this question:
- The Gateway is in AWS so it will authenticate to Akeyless via AWS IAM auth
- Gateway configuration will also happen from Terraform via AWS IAM Auth
- Our admins will have an option to configure the Gateway via SAML
Terraform access to Akeyless is the only access method that we’ll configure manually. The rest will be configured by Terraform. It’s worth taking a moment to clarify why we’re going to use AWS IAM auth for Terraform. To understand that we have to consider where we will be running Terraform, and what auth methods might be available in those environments. First and foremost, Terraform will be running from our pipelines, which means that it will have a JWT (from Github). It will also have AWS access (since it will be deploying infrastructure to AWS). We’ll also want our developers to be able to run Terraform. They will primarily have SAML access, but will also have AWS access (which again, will be needed for Terraform to deploy infrastructure). As a result, our primary users of Terraform have one access method in common: AWS IAM auth. This is why we’ll setup Terraform to use AWS IAM auth when configuring AKeyless.
For point #3, we’ll also give our admins direct access to the Gateway in case they want to manually inspect/configure things. This access will be via SAML, of course. We setup SAML auth in the last blog post, so not too much to add there. Instead, we’ll focus on IAM auth used by Terraform.
IAM Auth for Terraform
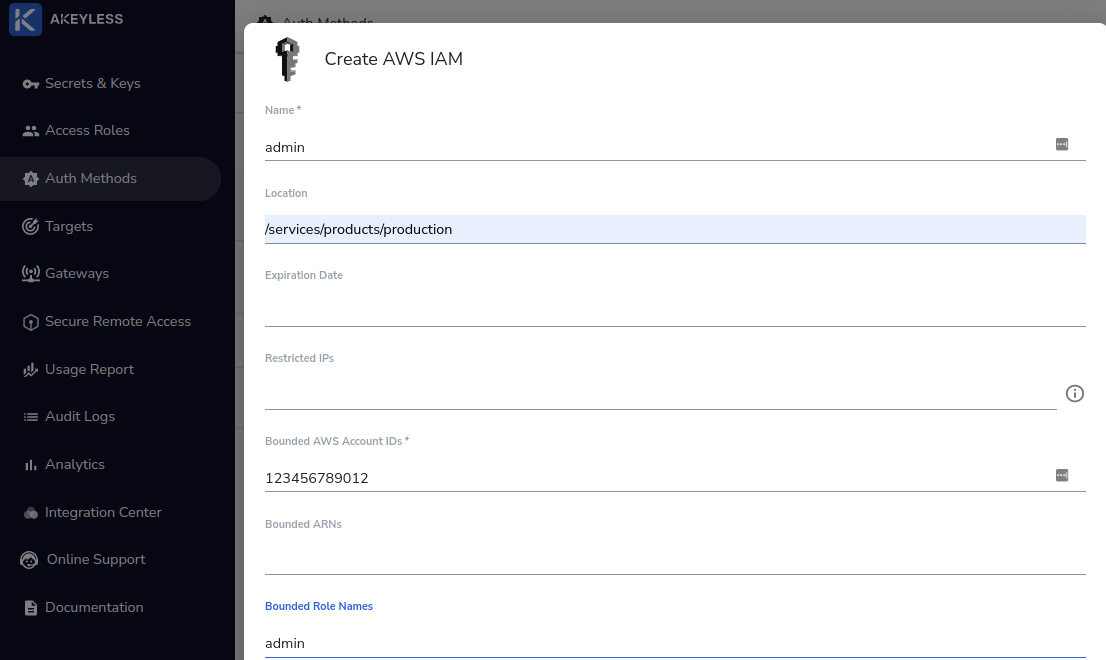
To set this up, we’ll login to the main Akeyless console (Use the SAML bookmark link from our last blog post if it’s helpful!). Click on “Auth Methods” on the left menu, then “+ New”, then “AWS IAM”. Let’s call the name admin and put it in our environment’s folder - /services/products/production. Under “Bounded AWS Account IDs” put in your AWS account number (a 12 digit number). Under “Bounded Role Names” enter admin. Then hit “Save”. This allows any infrastructure or user in the AWS account with the admin role assigned to it to login to Akeyless. Note that only the AWS account number is required when creating the AWS IAM auth method, but if this is all you provide then any infrastructure in the entire AWS account can login to Akeyless. This probably isn’t what you want, so make sure and put in a bounded role name or other appropriate restriction:
Next we have to assign permissions. Terraform will be creating pretty much everything in the long run, so we’re going to save some trouble and assign it to the admin role for our environment. To do this go back to “Access Roles” in the left menu and then find our admin role (under /services/products/production/admin). Click on it, and then in the top right hit the “+ Associate” button. Select the AWS IAM auth method we just created (admin) and then hit “Save” to associate it with the role (ignore the subclaims input - that doesn’t apply to AWS IAM auth). This gives anyone who logs into Akeyless with the admin AWS role full admin privileges in Akeyless on the /services/products/production/ folder.
Of course this isn’t usable currently because the admin role doesn’t exist in AWS. We’re going to manually create this as well. As the name implies, we’re creating a role with admin privileges in AWS. This role will be used via an assume role flow, so it won’t be associated with a specific AWS service. To create this from the AWS console:
- Go to “IAM” -> “Roles”
- Click “Create Role”
- Under “Trusted entity type” Select “AWS Account”
- For the account to use, select, “This Account”
- You don’t need an external ID or MFA. Hit “Next”
- Under the list of permission policies select
AdministratorAccess(it is probably easiest to search for it) and hit “Next” - Under “Role Name” enter
admin - At the bottom, select “Create Role”
We’re now ready for our initial deployment!
Note It can be confusing because we have an admin role in AWS and an admin role in Akeyless. If you get confused, just consult the access diagram
Akeyless
Gateway Deployment